Did you know that on October 24th of 2021, that will be the second year in a row to celebrate the newly formed WORLD KANGAROO DAY? It was created in the aftermath of the devastating bushfire of 2020 that killed 3 billion Australian animals such as koalas, kangaroos, and many, many more.
Australian Kangaroo fans are hoping this will limit the commercialized killing of that precious animal in Australia.
Watch the heartbreaking video at the end of this blog that tells you more about this tragic fire and its impact on one of the kangaroo sanctuaries. I must admit, it had me in tears.
Perhaps, if you check out my newly published 48-page illustrated chapter book about Australian kangaroos and wallabies, you will fall in love with them, too.
The book is called "Zeb and Deb Spy Kangaroos and Wallabies."
Little did I know that when I photographed these cute critters in February of 2019, some of those I photographed might have actually died in that fire. I pray that is not the case.
Zeb and Deb Spy Kangaroos and Wallabies by Debbie Dunn
Book Description:
Ten-year-old twins, Zeb and Deb, adore seeing the world with their travel-writing dad. Where are they going this time? The homeschooled fourth graders will cruise to Australia.
What will they do on this journey? They will photograph kangaroos and wallabies at five Australian animal venues: (1) Reptile Park, (2) Symbio Wildlife Park, (3) Taronga Zoo Sydney, and (4) Blackbutt Reserve in the state of New South Wales plus (5) Bonorong Wildlife Sanctuary in the island state of Tasmania.
In honor of the newly formed annual World Kangaroo Day, celebrated on October 24th, join Zeb and Deb on this fantastic adventure!
Here is the Amazon Link to all anti-bullying curriculum books plus all children’s books written by Debbie Dunn (both paperback and Kindle). It will open up in a new window.
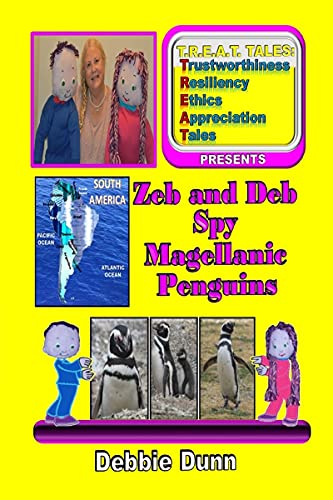
Did you know that April 25th is World Penguin Day? Just in time, my 48-page illustrated chapter book about Magellanic Penguins got published earlier this week. It is called "Zeb and Deb Spy Magellanic Penguins." It is appropriate for kids of all ages - especially those between the ages of 6 to 10.
FYI - Check out the video at the end of this blog that describes more details about World Penguin Day.
Zeb and Deb Spy Magellanic Penguins by Debbie Dunn
Book Description:
Ten-year-old twins, Zeb and Deb, adore seeing the world with their travel-writing dad. Where are they going this time? The homeschooled fourth graders will cruise to South America.
What will they see on this journey? They will visit two reserves for thousands of Magellanic Penguins. The first one is located in Argentina. It is called Punta Tombo. The second one is located in Chile on a lighthouse-topped island in the middle of the Strait of Magellan. It is called the Penguins Natural Monument.
In honor of World Penguin Day, celebrated on April 25th of each year, join Zeb and Deb on this fantastic adventure!
Here is the Amazon Link to all anti-bullying curriculum books plus all children’s books written by Debbie Dunn (both paperback and Kindle). It will open up in a new window.
During the pandemic, I am taking taste-bud journeys as I self-isolate rather than physical journeys. Here is my adapted recipe for making a second round of Mixed Fruit Roll-ups. It was inspired by the many video tutorials to be found on YouTube. This round, I hoped to do a better job of spreading out the fruit mixture in such a way that it was thicker on the edges than in the middle. I also experimented by using a much higher temperature than the last time I made a similar recipe. That way, I can compare results.
Conclusion: I have learned that 165 degrees Fahrenheit is probably too high of a temperature and 125 degrees is probably too low. Next time I make this, I will try 145 degrees instead. Using the highest temperature in a Cosori Dehydrator possible, 165, made them too dry to roll. Instead, just like you would peanut brittle, I had to break the finished product into large pieces. They were somewhat pliant but not enough to roll. They did not have a scorched or burnt taste. They were delicious like candy. They just were too brittle to roll. At 165 degrees, I dehydrated them for 6 1/2 hours. Then, I peeled them free and flipped them the best I could. I gave the pieces an additional 45 minutes to dry the still wet spots on the flipped side.
I have also learned that when using a raised-lip silicone mold, I should not try to get the batter to reach the edges. Instead, I should try to treat the mixture like I would if the silicone mold was flat and I had to make certain the edges of the mixture were scooted together like I did for the one tray where I actually used a flat silicone mold. That was the only one that peeled off without breaking. The other five trays, where I used the lipped molds, they were all impossible to peel off as one unbroken piece.
My other learned lesson is that although the mixture needs to be a bit thicker on the edges than in the middle, I should not allow the middle to be too thin. Since I made this mistake, the middle pieces had to be peeled off in smaller chunks. I placed those broken chunks into a cereal bowl and munched on them while I gave the other pieces an additional 45 minutes in the dehydrator after I had flipped them.
Recipe
Thawed frozen fruit such as raspberries, peaches, blackberries, and strawberries
2 containers of single-serving unsweetened applesauce
2 cans of sliced peaches
Coconut Oil to grease the silicone molds
3 tablespoons of Chia Seeds (for binding and extra nourishment)
1 teaspoon of Xanthan Gum (for binding)
Eight long squirts (to taste) of Grape Water Enhancer (flavored sweetener)
Procedure - I made some tactical errors that I have learned from. I used red to reflect what I should have done instead of what I actually did on this second round of attempting to make fruit roll-ups.
Step 1: Using a food processor, blend all solid fruit into a purée.
Step 2: Mix whatever fruit together that you personally find to be a tasty mixture. In my case, I used strawberries, raspberries, blackberries, peaches, and unsweetened applesauce.
Step 3: Add as much or as little sweetener as you find to be pleasing. Since I had a large mixing bowl full of blended fruit, I gave it about eight long squirts of Grape Water Enhancer.
Step 4: Once you feel the taste is exactly what you desire, add in 3 tablespoons of Chia Seeds to help bind this mixture together plus add extra nourishment. Also stir in 1 teaspoon of Xanthan Gum. After stirring it all in, set your timer for at least fifteen minutes to give it time to gel.
Step 5: Load your trays with this fruit mixture on silicone molds with lips on the side to prevent the mixture from spilling over to the trays below. Using an offset spatula, spread out the mixture to be about 1/8 to 1/4 inch thick. Do not try to push the mixture to the edges of the raised-lipped mold. Instead, using the offset spatula, push the edges together about 1/2 inch or a bit more from the edges of the mold. That will make this much easier to peel and flip.Make certain the mixture is thicker on the edges than the middle. However, do not make the middle parts too thin. That was a mistake on my part that I have now learned from.
Step 6: Plug in your dehydrator and set the temperature gauge to 165 degrees Fahrenheit. Set the time for four hours so you can check on how the drying process is going. I now know that 165 degrees is too high of a temperature to use. I have already learned that 125 degrees was too low. I will try 145 degrees the next time I make these. I ended up dehydrating the current batch for 6 1/2 hours, peeled off what I could, and then flipped what remained over and dehydrated the flipped pieces for an additional 45 minutes. I left them to sit in the dehydrator for the rest of the night while I slept. In the morning, I ended up having to break up the large pieces into small enough pieces to fit into my storage container - kind of like what you would do to peanut brittle. They were not burnt or scorched at all. They were even a tiny bit pliant feeling. Just not pliant enough to roll. They were brittle enough to easily break into medium-size pieces.
Step 7: So when i get around to making round 3, I will try dehydrating them at 145 degrees Fahrenheit. I will also not follow through on the other lessons I learned from this second round. Progress forward but not out of the woods yet, so to speak. In any case, these are quite delicious like yummy candy. I will have no problem at all in consuming them over the course of the next few days. Then and only then will I attempt round three. Lol!
Here is a video tutorial for how to make applesauce fruit rollups in the oven. It is short and sweet. The chef dried hers for 6 to 8 hours in the oven at 170 degrees Fahrenheit.
In case you are interested in where I got these 'kitchen toys,' here are the links. They will all open in a new window. FYI - I don't get any special perks for posting these. This is simply listed for the convenience for people, like me, who adore kitchen gadgets and baking aids.
Here is the Amazon Link to all anti-bullying curriculum books plus all children’s books written by Debbie Dunn (both paperback and Kindle). It will open up in a new window.
During the pandemic, I am taking taste-bud journeys as I self-isolate rather than physical journeys. Here is my adapted recipe for making a half-recipe called Easy Yogurt Cake with Chocolate Chips. It was inspired by a recipe blog by Diana Moutsopoulos. This is apparently a well-known French recipe.
Conclusion: This recipe makes either twelve full-size muffins or eighteen muffin-tops. They were definitely moist and filled with rich chocolate flavor. There is no need for icing as they are plenty rich on their own.
I might like to try making these muffins using butterscotch chips or toffee chips. It might even be fun to try them using fruit instead of flavored chips. I could definitely make these again exactly as is. All in all, this was a very nice dessert option.
Recipe that has been halved
6 tbsp plain yogurt
3 tbsp grapeseed oil plus extra oil to grease the muffin tins
1 egg
3/4 cup white sugar
1/2 tsp vanilla extract
2/3 cup all-purpose flour
1 1/4 teaspoons baking powder
1/4 tsp fine sea salt
1/4 cup mini chocolate chips and/or M&M's
OR Here is the Whole Recipe
3/4 cup plain yogurt
1/3 cup cooking oil plus extra oil to grease the muffin tins
2 eggs
1 1/2 cups white sugar
1 tsp vanilla extract
1 1/3 cups all-purpose flour
2 1/2 teaspoons baking powder
1/4 tsp fine sea salt
1/2 cup mini chocolate chips
Procedure
Step 1: Preheat the oven to 350 degrees F. Grease muffin tins - enough to make 18 muffins.
Step 2: Empty the yogurt into a mixing bowl. Whisk in the cooking oil.
Step 3: Add egg, sugar, and vanilla extract to the mixture. Beat well until thoroughly combined.
Step 4: Add flour, baking powder, and salt. Stir until just combined.
Step 5: Stir in chopped-up chocolate chips.
Step 6: Pour into the prepared muffin tins. This batter will produce 18 muffins.
Step 7: Bake in the preheated oven for 25 minutes until a toothpick inserted in the center comes out clean. Allow them to cool completely before serving.
Recipe Source and video tutorial will open in a new window.
Here is the Amazon Link to all anti-bullying curriculum books plus all children’s books written by Debbie Dunn (both paperback and Kindle). It will open up in a new window.
During the pandemic, I am taking taste-bud journeys as I self-isolate rather than physical journeys. Here is my adapted recipe for making Teriyaki Steak with Pineapple in a Crockpot. It was inspired by viewing four different recipes from which I selected my favorite ingredients.
Conclusion: I found the sauce to be enjoyable, the vegetables I added were a nice touch; however, the steak itself was a little 'cloudy' tasting. I think that was more a reflection on the quality of the steak than the recipe. I think this would be better using a higher cut of beef. All in all, I did find this a pretty good meal. That's a good thing as there are enough leftovers for probably four more meals. I will probably freeze half of that to enjoy at a future time.
Recipe
1/2 cup pineapple juice
1 cup pineapple chunks from cutting up 5 pineapple slices
1/4 cup soy sauce
1/2 cup teriyaki sauce
1 tablespoons rice vinegar
3/4 cup brown sugar
1 tbsp sesame oil
4 tbsp to place in Ninja 4-in-1 cooker to sear steak
1 tsp ground ginger
1/2 tsp fine sea salt
3 tablespoons cornstarch
3 tablespoons water
steak cut to bite-size pieces
Meat Tenderizer
La Choy Stir Fry Vegetables, Traditional (drain juice) [OPTIONAL]
Procedure
Step 1: Wash and cut-up steak into bite-size pieces. Also, cut up 5 (or more) pineapple slices into chunks.
Step 2: Stir together water and cornstarch until there are no lumps. Then, prepare marinade by mixing that with all ingredients listed above with the exception of the pineapple chunks, the vegetables, and the steak.
Step 3: Sear the steak on the Stove-top setting of the Ninja 4 in 1 cooker with Auto IQ. Season the steak with Meat Tenderizer. Add in the pineapple to sear a bit, as well.
Step 4: Pour in the marinade mixture. Mix well.
Step 5: If desired, add in some vegetables that you feel would be compatible with teriyaki steak and pineapple. [FYI - I added in the can of La Choy Stir Fry Vegetables after draining the can, after 3 hours of cooking. I meant to add them at the beginning but had forgotten them until that point. ]
Step 6: Set the cooker to the Crockpot setting and cook the entire mixture for four hours.
Step 7: Serve this meal with rice.
Step 8: Eat and enjoy!
Recipe Sources: These recipe blogs will each open up in a new window. I used part or most of the listed ingredients indicated by these chefs. I also made use of ingredients or food items I had available in my pantry, refrigerator, or freezer.
Here is the Amazon Link to all anti-bullying curriculum books plus all children’s books written by Debbie Dunn (both paperback and Kindle). It will open up in a new window.
During the pandemic, I am taking taste-bud journeys as I self-isolate rather than physical journeys. Here is my adapted recipe for making a variation of Avocado and Tuna Tapas. It was inspired by discovering a Spanish recipe post by La Cocina de Redondita. A link to her full recipe is included below.
FYI - I did not use two of her ingredients due to my personal taste-preference. I also used some different amounts than her original recipe. This makes 2 to 3 servings for a light lunch or snack.
Conclusion: I found this recipe to be pretty tasty. It was a nice alternative to tuna salad. Little by little, I am attempting to use up the enormous number of canned tuna I purchased at the beginning of the pandemic. Lol!
In addition to Wheat Thins, I found that this recipe was quite tasty served on top of a crunchy Six Seeds Cracker that I made the previous day. See the link below if you wish to view that recipe.
Recipe
1 (12 ounce) can or 2 small cans of solid white tuna packed in water, drained [FYI- I only have the kind packed in olive oil, so that is what I will use.]
2 tablespoon mayonnaise
½ cup green bell peppers, chopped
1 tablespoon balsamic vinegar
1 teaspoon garlic herb salt
2 ripe avocados, halved and pitted [I am using two containers of mashed avocados instead.]
Procedure
Step 1: Cut up frozen bell peppers using a food processor. Naturally, if you have a raw bell pepper, you could use that instead. Since I was using Stir together tuna, mayonnaise, red pepper, and balsamic vinegar in a bowl.
Step 2: In a microwave steamer, add the cut-up bell peppers. Add the entire contents of the tuna can or cans including the olive oil. Mash the tuna. Stir in the balsamic vinegar, mayonnaise, and garlic herbal salt. Place the lid on the steamer and microwave for two minutes.
Step 3: Add in the 2 containers of mashed avocado. Mix thoroughly.
Step 4: Either eat this as is or as a dip on one of your favorite crackers. My crackers of choice were Wheat Thins. Enjoy!
Here is the Amazon Link to all anti-bullying curriculum books plus all children’s books written by Debbie Dunn (both paperback and Kindle). It will open up in a new window.
During the pandemic, I am taking taste-bud journeys as I self-isolate rather than physical journeys. Here is my adapted recipe for making Six Seeds Crackers. It was inspired by the chef who calls herself Heavenly Fan. Her recipe that features five seeds is linked below along with her tutorial video.
Conclusion: These are really, really tasty! I found myself binge-eating a whole bunch of them just like I might do that with eating roasted pumpkin seeds or roasted sunflower seeds. It was crunchy and rather addictive. To me, it tasted good as is. It also tasted good with an avocado and tuna recipe I made that will be blogged about tomorrow. I will most definitely make these again.
FYI - The canister pictured below shows what are left of the 4 dozen round crackers as I ate a whole bunch of them in one sitting. Good thing these are full of fiber and nourishment! Lol!
Recipe
1/2 cup pumpkin seeds
1/2 cup sunflower seeds
1/4 cup chia seeds
1/2 cup white sesames
1/4 cup Hemp Seed Hearts
3 tbsp psyllium husk powder
4 tbsp ground flaxseed
1/2 tsp fine sea salt (adjust to your taste)
3 tbsp dried celery flakes (or other herbs of your choice)
½ cup cold water
flax seed oil to grease baking dish
Procedure
Step 1: Mix all dry ingredients together in a bowl.
Step 2: Add in the water and mix everything well. Leave to rest for 15 minutes while you preheat the oven to 300 degrees Fahrenheit.
Step 3: Liberally grease muffin tins with flax seed oil or other cooking oil of your choice.
Step 4: Spread the seed mixture in muffin tins and press down like you would brown sugar.
Step 5: Bake in a 300 degrees Fahrenheit preheated oven for 40 minutes or till crispy).
Step 6: Leave to cool for a few minutes and enjoy. Just in case, I stored these crackers along with an oxygen absorber on the chance that it might help keep these crackers fresh for a longer period of time. I'm not sure if that is necessary or not. I just didn't want to take any chances.
Please note: Recipe source will open in a new window.
Here is the Amazon Link to all anti-bullying curriculum books plus all children’s books written by Debbie Dunn (both paperback and Kindle). It will open up in a new window.
During the pandemic, I am taking taste-bud journeys as I self-isolate rather than physical journeys. Here is my adapted recipe for Pineapple Upside-Down Cake. It was inspired by Chef John's recipe linked below. I halved his recipe and made a couple of other adjustments to suit my taste buds and available ingredients.
My conclusion: Other than I think I need to add even more pineapple next time, I found it to be absolutely delicious! I am so very glad I found this recipe!
Halved-Recipe for bottom layer
1/8 to 1/4 cup butter
6 tbsp brown sugar
2 to 4 tbsp pineapple juice
[FYI - I only used 1/8 cup of butter and 2 tablespoons of pineapple juice. Next time, I think I should use 1/4 cup butter plus 4 tablespoons of pineapple juice.]
Procedure for making bottom layer
Step 1: Preheat the oven to 400 degrees F.
Step 2: Melt 1/8 cup butter in a skillet over medium-low heat. Stir in brown sugar, and pineapple juice. Cook over medium-low heat for about five minutes until sugar is dissolved and mixture is bubbling.
Step 3: Pour that mixture into a medium-size greased baking pan.
Halved-Recipe for middle layer
canned pineapple pieces
Procedure for making middle layer
Step 4: Spread pineapple pieces in a layer over the brown sugar mixture, completely covering the mixture. Set baking pan aside. [FYI - I only used about half a can of pineapple. Next time, I intend to use the entire can and really squeeze in as much pineapple as I can.]
Halved-Recipe for top layer
Another ¼ cup butter
¾ cup all-purpose flour
¼ tsp fine sea salt
1 tsp baking powder
¼ tsp ground cinnamon
¼ tsp ground nutmeg
¼ cup white sugar
¼ cup cold milk
1 egg
Procedure for making top layer
Step 5: Melt 1/4 cup butter in small skillet over low heat until the butter begins to brown and release a nutty fragrance, about 5 minutes. Watch carefully, butter burns easily. Remove from heat and let cool for 10 minutes.
Step 6: Whisk together flour, cinnamon, nutmeg, salt, baking powder, and white sugar in a large bowl.
Step 7: Whisk in egg and cold milk until just combined.
Step 8: Pour in melted butter and stir to mix thoroughly.
Step 9: Pour batter over the pineapple slices in the baking pan; spread evenly to cover. Try not to disturb the pineapple slices as you cover them with the batter mixture.
Step 10: Bake in preheated oven until the cake begins to bubble around the edges, the top is browned, and a toothpick inserted into the center comes out clean, about 30 minutes. Let cool in the baking pan for 10 minutes.
Step 11: Loosen the cake from the baking pan by running a knife around the inside edge of the cake. Invert a large plate over the top of the pan and flip over, releasing the cake to show the pineapple slices on top.
Here is the Amazon Link to all anti-bullying curriculum books plus all children’s books written by Debbie Dunn (both paperback and Kindle). It will open up in a new window.